Yes, that's right! We're in the new house!
Thanks for all of your kind comments. Overall, the move went well. There were a few little *things* like the screws for my son's bed disappeared, a few light scratches turned up on the kitchen dresser and the hot tub tipped and fell on the inside of the truck after it was loaded. The relo company will send a furniture guy out to patch up the dresser. The fact that all of the china, crystal, kitchenware, antiques etc. made it in tact is amazing.
The super-duper great news is that we sold our Chicagoland house in the final hour. People wanted to get in (really get in) the day we vacated. The showing was set for 7:00 p.m. We finished vacuuming and cleaning out the sinks then locked the door behind us for the final time at 6:55. The offer came in the next morning and after relo and buyers negotiated for a day, a deal was made. This means we not only got our buyout price but a 2% selling bonus.
We were stunned and felt sooooo lucky.
On this end I've been plugging away at getting things organized. I don't want to just shove things into closet and cupboards. I did that at the last house and it never got done properly. This time, I'm taking my time.
Last night I was surprised when my little brother and his buddy from work stopped by. I knew he travels to this area a few times every quarter so it was nice for the visit.
The kitchen, sunroom, dining room and both boys' bedrooms are sorted out. Today's task is...... THE SEWING ANNEX !
I know I won't get it all done. But if I can at least get the main area complete, all systems will be GO! And I'm ready to GO!
Thanks again for all of your kind wishes!
Tuesday, June 10, 2008

Monday, May 26, 2008
The Invasion
The movers invade tomorrow and start packing us up. I'm so excited! This has been in the works since October and I'm thrilled that it is finally happening!
Sewing and my projects has kept me sane. There has been much to do and many details to sort out. And I'm a worrier. I even worry about the fact that I worry too much! Sewing has kept my mind occupied and has helped to pass the time.
I'll have email access for another week, but my online time is likely to be sporadic. I have many of your blogs to catch up on, and I will definitely do that once I'm settled in or need a break from the hoo-ha. Rest assured, my low activity at the moment is not due to lack of interest.
Now, up to my sewing room to finish packing all of my things that are NOT being handled by the movers.
Sewing and my projects has kept me sane. There has been much to do and many details to sort out. And I'm a worrier. I even worry about the fact that I worry too much! Sewing has kept my mind occupied and has helped to pass the time.
I'll have email access for another week, but my online time is likely to be sporadic. I have many of your blogs to catch up on, and I will definitely do that once I'm settled in or need a break from the hoo-ha. Rest assured, my low activity at the moment is not due to lack of interest.
Now, up to my sewing room to finish packing all of my things that are NOT being handled by the movers.
Sunday, May 25, 2008
Vintage Jewelry
Vintage jewelry and accessories are part of the territory when you love vintage clothing.
Ladies of the day certainly knew how to pull an ensemble together. Whenever I hit garage sales or the local Goodwill, I look for jewelry (amongst other things). On the list are pins, scarf clips, bracelets and in particular, clip on earrings.
I suppose I have an affinity for the earrings because when I was a girl, my grandmother had an old fabric jewelry box filled with costume jewelry. No doubt, it wasn't expensive stuff. It was mostly from the 50's and 60's, the kind of jewelry that dripped with beads, faux pearls and sequins. The majority of her collection was earrings.
Unfortunately, I don't know what ever became of her jewelry. It's likely that my grandfather gave it to charity, the Disabled American Vets, when clearing through her things some years after she died. At least it went to a good cause.
So when I buy vintage or vintage-like jewelry, it's no surprise that I go for the stuff that looks like the items from my grandmother's collection. Here are some of the things I've picked up along the way.
Have a happy and safe Memorial Day weekend; a heartfelt and respectful thanks to those who died in the line of duty. You will never be forgotten.


Monday, May 19, 2008
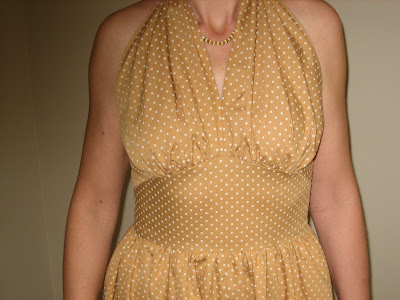
The Dress is Finished
I've finished, been photographed by my official photographer (my husband) and got my PR review written and submitted into the Vintage Contest.
The more I work with vintage patterns, the more I love them. Not only is the attention to styling and fit superb, but in my experience with them, they sew together so well. Feel free to read my full review on PR.




Saturday, May 17, 2008
This Week's Work
I'm lumping a lot into one post. I've been on a mission this week to complete the project, taking lots of pictures. But by the end of the day after the kids were in bed, I was just too tired to post. Be alerted: this is a long post!
The collar and cuffs are made from the dot dress fabric. Initially, I had some concerns about how the slightly stiff but lightweight fabric would handle the curves. I didn't need to worry, it sewed up beautifully. For the collar, I made the facing piece out of the linen/silk jacket fabric and used fusible interfacing. For the cuffs, both the fabric and the facing piece were the dot fabric and again, I used fusible interfacing for the facing piece.
After seaming the two collar pieces around the outside edge, I pinked the seams. It was easy to press the seams out prior to turning. The pattern didn't call for understiching. Even though the dot fabric pressed out nicely, I wanted the collar to keep it shape so I understitched anyway. When I pressed the finished collar flat, I was pleased with the smoothness of the curves.


Attaching the collar to the jacket was straight forward. Everything lined up perfectly and there wasn't any fussing to ease at the back neckline. After seaming, I graded the layers when trimming, longest layer being the one closest to the garment.


The next step was constructing and attaching the facings. The front facings were attached to the back neck, the middle back was attached to the back sides, which were attached to the side of the fronts! It was one big loop and I had to keep checking to make sure I'd sewn them together properly!
The pattern didn't call for finishing the edges of the facing that would be attached to the lining. I gave them a quick zig zag...
Then I constructed the cuffs. As with the collar, there were no instructions to understitch after the cuff and facing were seamed on the outer edge. After trimming and pressing out, I understiched the facing side.
For attaching the cuffs, the instructions called for the jacket sleeve to be sandwiched between the cuff layers, kind of like cuffs on a shirt. Because the lining would be pressed under and slipstiched, I sewed them on right sides together instead, then turned and pressed the seams up towards the sleeve . I understitched AGAIN on the sleeve.


After this, I did the buttonholes. It was during this that I had a mishap that I'll call The Blue Chalk Incident. It was my Token Project Incident, which I have come to expect with every project. In fact, until said incident occurs in any given project, I get uneasy, feeling that my project will spontaneously burst into flames. Once the Token Project Incident has taken place, I feel as though order has been restored in my sewing universe. Said project has survived and I can carry on to completion.
I was hesitant to use blue chalk because I didn't want it to stain the ivory linen/silk. Against my better judgment, I used a wee bit to lightly mark the lines of my buttonholes... well, I don't really want to relive this so the basic story is that after marking the lines, my phone rang. In a rush to answer the phone, I placed the chalk down on top of the jacket (cringe)... It just so happened I bought a new iron and my old iron was sitting on my cutting table next to where the jacket lay. In the haste to grab the ringing phone, my hand knocked over the iron right on top of the chalk, which broke into many pieces, leaving blue marks all over the front of my jacket.
I nearly cried, realizing that I'd have to wash the whole thing. So that ended my sewing for the day. After washing the jacket (and yes, the blue chalk came out) it lined dried over night. What a buzz kill!
Then I had to iron and press the whole thing out the next day. This set me back time wise, but as far as mishaps go, I was thankful the jacket wasn't ruined. By the time I finished pressing, I had fully recovered from the Blue Chalk Incident and moved on to the lining, after tacking the facings in place.
Although the instructions called for the entire lining to be hand slip stitched on, I machine stitched it in along the fronts, between the top of the darts, and around the back neck edge. This was so much quicker and efficient. I then slip stitched the sleeve linings.
After the sleeves, I pinned the bottom lining edge in place. I treated it a bit like a hem, measuring from the bottom of the jacket up. I wanted to avoid pulling and puckering from an uneven lining.
Almost finally, I decided to make matching covered buttons out of the dot fabric. I had two packs of covered buttons lurking my stash and when I read the instructions, I saw the easiest pattern EVER! The button pattern provided on the packaging is a circle that says "Button Pattern". I thought that was hilarious! Having said that, I was thankful that they took the guesswork of what size to cut.
Because the dot fabric was thin, I interfaced the circles with fusible... Four dots fit perfectly on the front of each button. I just needed to be mindful of placement so that they were all uniform when complete.


I got the buttons sewn on right before dinner. I still need to sew on the snap and that's it! For all practical purposes, it's finished!
Overall, I'm pretty happy with this project. The only thing I wish was a bit different was the ironability of the linen/silk. It is difficult, and nearly impossible, to get some creases to press out, much more so than pure linen.
Nevertheless, the end result is nice. I'll get pictures tomorrow, post them and then write up the review on PR for the Vintage Contest.
Monday, May 12, 2008
On to the Jacket
I hope that everybody had a wonderful Mother's Day! I sure did! Apart from getting lots of sewing in, yesterday my husband and boys cooked breakfast and kept bringing me coffee refills! When all of that caffeine kicked in, I was a sewing mad woman!
I got the dress completed. Thanks for all of the wonderful comments about the crochet edging. It's triggered my crocheting bug a bit and I hope to do more of it for decorative trim work. Paula, I've posted a pic of the pattern book from which I got this design. It's #38.
The thing about these 50's dresses with ginormous skirts is that they require a bit of management. For my skirt management, I stack plastic storage boxes beside my sewing table. This gives extra surface area and prevents the weight of the garment from sliding off of the table and pulling while sewing.
By adding the skirt lining, There was even more weight. I always try to keep my garments as smooth as possible while sewing. Admittedly, I'm slow. I frequently stop and adjust to prevent the garment from twisting and becoming distorted. By doing this, I find that I can sew straighter because the garment lays better. I don't mind that I sew slowly. My priority is try to sew as accurately and straight as possible. Results vary depending upon fabric and design!


After finishing the dress, I moved on to the jacket. The ivory linen/silk blend fabric arrived from Thai Silks on Friday. It's nice stuff! I can't decide if it behaves more like a linen or a silk. It's a bit stiff. This could be good for the structure required for a jacket; I just hope it doesn't end up being too much like cardboard. I'm also thinking about what the appropriate interfacing should be.
I did a quick measure of the jacket pieces and held it against myself to check if any adjustments needed to be made. It appeared a bit big through the back shoulders. I've had this issue before. On dresses with straps or a halter, shortening the straps or neckline pulls takes out the extra room. It's a minor adjustment and I'm not sure if this means I have a sway back, square shoulders or just a small bustline in comparison to my waist and hips (well, I know I do... but is here more to it?).
So I consulted my book "The Perfect Fit" to see what I should do about the back shoulder area. I don't want to add darts to the top of the jacket. The book described how to take out excess by pinching a pleat into the pattern piece prior to cutting. I used this method.
 My goal for the day was to sew all of the darts for both the jacket and the lining. There were twelve in total: two verticals at back waistline, two verticals at front waistline and two antled ones at the bustline. I then seamed the jacket at the shoulders and the side.


I got the dress completed. Thanks for all of the wonderful comments about the crochet edging. It's triggered my crocheting bug a bit and I hope to do more of it for decorative trim work. Paula, I've posted a pic of the pattern book from which I got this design. It's #38.
The thing about these 50's dresses with ginormous skirts is that they require a bit of management. For my skirt management, I stack plastic storage boxes beside my sewing table. This gives extra surface area and prevents the weight of the garment from sliding off of the table and pulling while sewing.
By adding the skirt lining, There was even more weight. I always try to keep my garments as smooth as possible while sewing. Admittedly, I'm slow. I frequently stop and adjust to prevent the garment from twisting and becoming distorted. By doing this, I find that I can sew straighter because the garment lays better. I don't mind that I sew slowly. My priority is try to sew as accurately and straight as possible. Results vary depending upon fabric and design!


After finishing the dress, I moved on to the jacket. The ivory linen/silk blend fabric arrived from Thai Silks on Friday. It's nice stuff! I can't decide if it behaves more like a linen or a silk. It's a bit stiff. This could be good for the structure required for a jacket; I just hope it doesn't end up being too much like cardboard. I'm also thinking about what the appropriate interfacing should be.
I did a quick measure of the jacket pieces and held it against myself to check if any adjustments needed to be made. It appeared a bit big through the back shoulders. I've had this issue before. On dresses with straps or a halter, shortening the straps or neckline pulls takes out the extra room. It's a minor adjustment and I'm not sure if this means I have a sway back, square shoulders or just a small bustline in comparison to my waist and hips (well, I know I do... but is here more to it?).
So I consulted my book "The Perfect Fit" to see what I should do about the back shoulder area. I don't want to add darts to the top of the jacket. The book described how to take out excess by pinching a pleat into the pattern piece prior to cutting. I used this method.

Because the color is a light ivory, I used tailor tacks to mark the darts. I didn't want chalk to stain the fabric.
The pattern has both a lined and unlined version for the jacket. I really don't like unlined jackets. I went to my stash to see what I could use for the lining. Because this is a summer dress and all of the fabrics thus far are 100% natural fibers, I wanted a natural lining as well. What is worse than having synthetic lining sticking to your body on hot day? Blech!
It just so happens that I have ten yards of ivory dupioni (54" wide bolt) lurking in my closet. The color was a perfect match; I didn't want a darker color to show through the jacket.
 My goal for the day was to sew all of the darts for both the jacket and the lining. There were twelve in total: two verticals at back waistline, two verticals at front waistline and two antled ones at the bustline. I then seamed the jacket at the shoulders and the side.
I tried it on to check fit. To be honest, it was hard for me to tell. The front obviously flops around and when I tug it here and there to get it in the right places, the position of my arms distorts other areas. Good ole Doris isn't quite my exact double, especially through the back. However, after trying on myself and Doris, it doesn't seem to be far off.
Next comes the fun part of interfacing, collar, etc. which I hope to accomplish today! Hopefully, there will be few interruptions.


Friday, May 9, 2008
Edging and Lace
After attaching the skirt to the bodice, I decided I wanted to put lace on the bottom of the skirt lining. I only had one white lace in my stash and it had a gathered edge. It just didn't speak to me.
So I decided that I would crochet the edging instead. My grandmother, who raised me, taught me to crochet when I was a little girl. She made lots of household things like those dolls with the big dresses to cover tissue boxes, pot holders and dishtowel embellishments that would allow a dishtowel to hang from kitchen cabinet handles. It was the 70's so most of these items were done in various groovy shades of brown, orange and yellow. She also made lots and lots of afghans.
I first was taught around the age of 6, starting off with long, long, LONG chains. It was good practice and helped me get the hang of holding the needle and using my fingers for tension. Eventually, I progressed to curly bookworm bookmarks and then started little afghans of my own.
Years ago, I started a big afghan out of a gorgeous wool blend yarn. I stopped when there were only about 15 or 20 rows left. It sat untouched for several years and I actually finished it when I sailed across the Atlantic in 1992. There's a lot of time at sea and not only was it a good use of that spare time to finish it, but also the afghan kept me warm on many a cold, wet night mid-Atlantic.
Like my sewing, crocheting went by the by for many years, replaced by the pursuit of more adventurous activities during my 20's. However, after my oldest son was born (who is now 10), I decided to crochet the Christening gown. Many folks thought I was mad to christen a boy in a gown, but I didn't care. My grandfather and brother were christened in a gown and I wanted to keep our family tradition, regardless if it was old fashioned.
After the gown, I picked up various books for making ornaments, tablecloths and edgings, and whenever I see a nice crochet yarn on sale that I like, I get it. My stash goes beyond fabric and sewing patterns!
I looked through my edging pattern book "Fifty Beautiful Edgings" and chose the one I thought suited my dress best. While the dress was hanging for the skirt to drop, I spent the last two days crocheting 118" of edging. It actually was good to do. I had a realtor tour on Wednesday so it was nice to kick my feet up for a while when realtors were coming in my house throughout the day.

Before I sew the hem and edging, I need to tweak one little section of the gathers on the skirt/bodice seam. I don't like the way it hangs - there's a goofy little pucker - so I'll adjust it. You know how that is - it would bug me so it's better to just do it now! OK, off to the sewing room!
So I decided that I would crochet the edging instead. My grandmother, who raised me, taught me to crochet when I was a little girl. She made lots of household things like those dolls with the big dresses to cover tissue boxes, pot holders and dishtowel embellishments that would allow a dishtowel to hang from kitchen cabinet handles. It was the 70's so most of these items were done in various groovy shades of brown, orange and yellow. She also made lots and lots of afghans.
I first was taught around the age of 6, starting off with long, long, LONG chains. It was good practice and helped me get the hang of holding the needle and using my fingers for tension. Eventually, I progressed to curly bookworm bookmarks and then started little afghans of my own.
Years ago, I started a big afghan out of a gorgeous wool blend yarn. I stopped when there were only about 15 or 20 rows left. It sat untouched for several years and I actually finished it when I sailed across the Atlantic in 1992. There's a lot of time at sea and not only was it a good use of that spare time to finish it, but also the afghan kept me warm on many a cold, wet night mid-Atlantic.
Like my sewing, crocheting went by the by for many years, replaced by the pursuit of more adventurous activities during my 20's. However, after my oldest son was born (who is now 10), I decided to crochet the Christening gown. Many folks thought I was mad to christen a boy in a gown, but I didn't care. My grandfather and brother were christened in a gown and I wanted to keep our family tradition, regardless if it was old fashioned.
After the gown, I picked up various books for making ornaments, tablecloths and edgings, and whenever I see a nice crochet yarn on sale that I like, I get it. My stash goes beyond fabric and sewing patterns!
I looked through my edging pattern book "Fifty Beautiful Edgings" and chose the one I thought suited my dress best. While the dress was hanging for the skirt to drop, I spent the last two days crocheting 118" of edging. It actually was good to do. I had a realtor tour on Wednesday so it was nice to kick my feet up for a while when realtors were coming in my house throughout the day.

Before I sew the hem and edging, I need to tweak one little section of the gathers on the skirt/bodice seam. I don't like the way it hangs - there's a goofy little pucker - so I'll adjust it. You know how that is - it would bug me so it's better to just do it now! OK, off to the sewing room!
Subscribe to:
Posts (Atom)
