Wednesday, September 30, 2009

Win a Vintage Pattern!

I want to thank all of the people who read and follow my blog, read my reviews on PR and those who voted for me in PR's Vintage Pattern Contest earlier this year. I'm humbled that my projects and ramblings are of interest to people when there are so many talented people out there in the blogosphere.

Therefore, as a token of my appreciation, I'm going to conduct a drawing for a vintage pattern. I have a huge stash of vintage patterns acquired from auctions and would like to share them with others who are passionate about vintage.

Here's how it will work:

  1. During the month of October, 2009 sew a project. It doesn't have to be vintage, just made during October.
  2. Post a comment here on my blog that includes a link to your project. I will keep track of the names.
  3. On November 1 (or shortly thereafter), I will put all of the names of those who participated into a (vintage) hat. My son will then draw two names from said hat.
  4. There will be two winners; the prizes will be the patterns pictured below. My son will pick the winner for Pattern #1 first, and Pattern #2 second. It will be completely random as to who wins which pattern.
  5. I will post my email address when the drawing is finished so that the winners can send me their mailing address.
I hope that people will participate! While most of us sew year round, projects have lots of exciting possibilities this time of year with all of the holidays just around the corner!

Thank you for visiting my blog; Happy Sewing!


Pattern #1-Vintage Simplicity 3528: late 50's/early 60's, B32, Partially cut, complete, instructions included


Pattern #2 - McCall's 2619: 1970, B36, factory folded, instructions included.

The Vintage Hat from which the names will be drawn: 100% wool, original price tag still attached, price paid $4.99. Any help dating?

Monday, September 28, 2009

In Memory of a Great Red Coat

I have/had a great, red wool winter coat. It was calf length with bulky, cuffed sleeves, a high collar and a dramatic drape that went of the left shoulder.


I bought the coat when I was 18 (er, um 1984) and it saw me through numerous winters. When I lived in the Virgin Islands for three years, I stored it at my grandfather's house. When I returned to Chicago and moved downtown in late '92, my beloved coat was reinstated into service.


The coat was warm and cozy with all of its bulk and high collar. And it stood out. On more than one occasion on a snowy-bad weather day (the kind when you and everybody else in Chicago is trying to hail a cab), I had a cabbie tell me he pulled over to me because he saw my red coat! Another time when out do dinner, I overheard a gentlemen at a table say to his friend as I walked by "That woman in the red coat looks like a model." (This was obviously a LONG time ago.) Who wouldn't love a coat that get that generates that type of reaction?

My poor coat did not fare well during my England years. It was damaged by moths, along with other silks and woolens, despite my efforts to protect my closet. I was devastated.

It's been eight or nine years since I discovered the holes and I could never bear to discard my wonderful coat. Maybe if I put it to the side, the moth holes will go away...

Well they haven't; I still have the coat. Maybe I'll be able to reconstruct it or salvage parts of it. It's a mess now, wrinkled, covered in dog hair and lint... I mourn this coat. I will bring it to the dry cleaners and see what I can do.

In the meantime, in honor of the red coat, last week I started a lightweight coat. I need a coat for autumn/spring weather, when there's that bite in the air but it's still too warm for a winter coat.

While looking through my stash, Louise's vibrant red, cotton twill kept jumping out at me. Originally, I wanted to make a trench from it. However, it's a vintage 36" wide and with only 3 yards, there wasn't enough fabric.

So I'm marrying old with new and making a stylish, modern coat from Vogue 8548 with this gorgeous, vintage fabric. I love the bucket collar; the twill should hold the shape well. I'm lining it with flannel back satin.

The coat has a fair amount of topstitching. Thanks to the ladies at PR I received some wonderful advice about which thread, needle, etc. to use. I'm using a heavier, topstitching thread by Gutterman and a topstitching 80/12 needle.


It's progressing well although there is considerable ease in the sleevecap which is giving me some fits. I usually don't have issues with sleeves, but I'm geared up to head to my sewing room and get this coat finished!

Must Have Red Coat!

Saturday, September 19, 2009

Update - Me Wearing the Blouse


DH took some pics of me in the blouse. As lovely as Doris is, it's always nice to see it on the person for whom it was made.


Thursday, September 17, 2009

Finally - The Blouse!

Yep, I finished it last week! With all of the landscaping, back to school activity, etc., DH hasn't had time to take any pictures of me in the blouse.

So I took some pictures this afternoon. The lovely Doris was kind enough to model for me, with the condition that she could hang out by the pool for a while and get some fresh air. It seemed a reasonable request to me. As soon as I get pics of me wearing it, I'll post them!

In the end, I had to cut out some of the armscye, 3/8" from the bottom (at the side seam), taping to the front and back about where the notches sit. Since I didn't have enough fabric to make more bias binding, I just narrow hemmed it. However, I think I may at some point take that out and make neutral/nude bias strips when I pick up an appropriate fabric. I think it will just lay nicer.

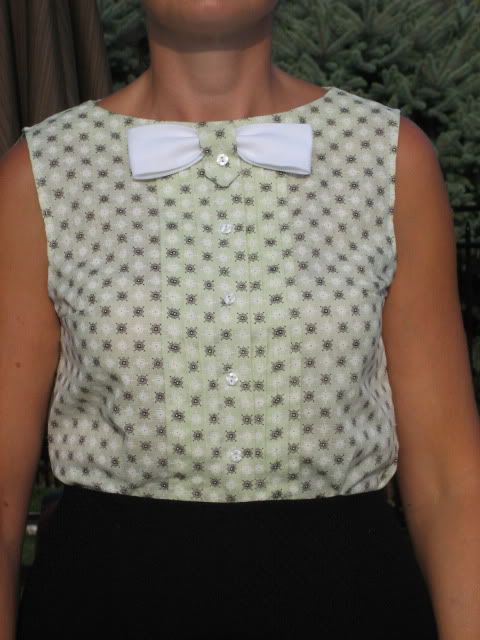
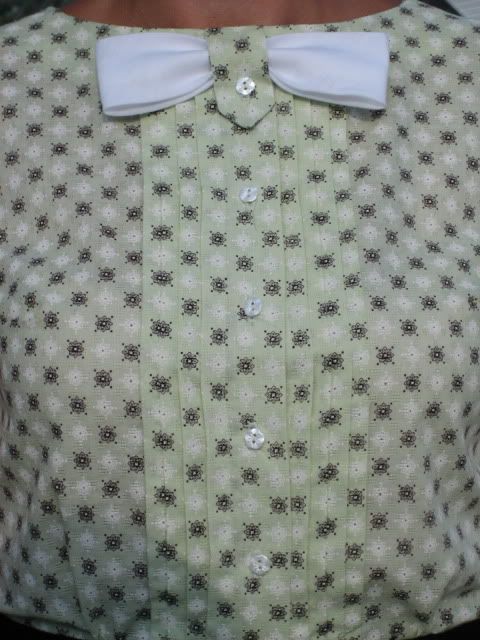
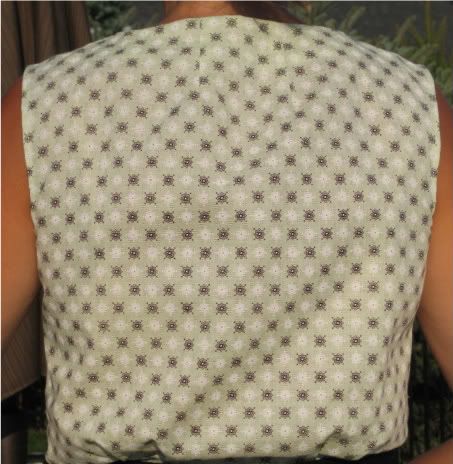
Despite this project taking longer than I'd expected, I'm pretty happy with the result. I've got that pretty, feminine blouse that I wanted.

In the meantime, I've been working on my youngest son's Halloween costume, a vampire ensemble. But I've got the bug to sew some autumn or winter vintage garments with some of the gorgeous woolens that were in Louise's haul from the May 23 auction... hmmm, I'll have to rummage a bit.

Sunday, September 6, 2009

Just Around the Corner

Halloween is just around the corner!

I love Halloween and I sew all of the costumes each year for my family.

I also enjoy making decorative items for around the house. Since the pool landscaping has kind of taken over... and I need to make some fitting adjustments to the armscye on my vintage blouse... I thought I'd work on a fun, simple project in between all of the other stuff.

For years I've wanted a Halloween fireplace mantle scarf, but always seem to have run out of time by the time Halloween came around. I even went so far last year as to design and cut out a pattern piece!

So I pulled out the Halloween quilting fabrics from stash. I stored my "pattern" piece with these fabrics and got to work on the mantle scarf. It was so simple and quick once I got going!

I measured the width and depth of the mantle itself, then added extra for the seam allowance. There wasn't enough length to cut the top/bottom pieces in one so there is a center seam. Using one of these pieces as a pattern, I cut a piece of quilting batting. The batting was basted to the bottom fabric.
I then cut two pieces of fabric for each of the large pendants. I sewed them right sides together, leaving the top open to turn... then I pressed each pendant. I alternated an orange pendant (with the witch/cat pattern) with a yellow pendant.

After all of the pendants were sewn, I spaced them out evenly beginning with middle and end one, leaving equal space inbetween each pendant. Then I made the little black pendants using the same fabric as the base pieces. I actually used the tab pattern piece from my vintage blouse, only enlarged it! It was exactly the shape I wanted!

I sewed the little pendants together the same as the large pendants. Then I pinned them in the spaces between the large pendants. Then I basted the pendants in place all the way around.

Finally, I sewed the top and bottom pieces right sides together (being careful to keep pendants away from seams as they were on the inside while doing this step). I left a three inch opening for turning.

Prior to turning right side out I clipped the corner to make sure they pushed out nice and square. Then I simply slip stitched the opening on the back.

After it was finished, I pressed it out.

I love the look of these fabrics together. They have that old fashioned, vintage feel. The fabric with the witch/cat print is at least seven years old and is from Northcott. The black with gold specs may also be Northcott, but I'm not sure. All the fabrics were purchased from a lovely quilt shop in England (when I lived there) called The Bramble Patch, which is in Weedon.

Now that I finally made this, I can hopefully get that darn vintage blouse finished this week!