Sunday, May 31, 2009

Summer Sizzle

I finished my dress on Thursday. Overall, I'm really pleased with the outcome! It would be nice if my figure was more like the lady on the illustration, but I'm not prepared to wear excrutiating undergarments to achieve that look! And I like food too much!
Anyway, I think the fabric works well with the style. In particular, I love the sizzling vermillion red.
As for the construction, it was very straightforward and easy. Here's how the rest of it went:
When the front facing is attached to the front bodice, the straps form tubes which need to be turned after stitching. Again, there are no instructions for understitching. I like understitching - a lot. It gives edges a crisp line and prevents rolling. It would be impossible to understitch after the center front and the side front stitching was done on the front bodice. So I seamed the side front, then understitched prior to stitched the center front. After the front facing is attached, the straps are basted to the bodice back. I already shortened the straps an inch and checked the length again prior to stitching the facing at the top seam.I noted above that I don't like how the facings were assembled. They had to be seamed as one with the side seam. But I believe this is necessary because of the criss-cross front straps assembly. Just be prepared for a bit of a fiddle - if you take the time, it will turn out. After the seams are sewn, the facings are tacked down at the side seams.

The skirt construction is straight forward. Front released darts and back darts are sewn. I changed the front darts. I didn't like how the release faced out TO THE SIDES instead of in to the center front. I checked many, many of my other vintage patterns with slim skirts and all of the released darts face in to the center... If the instructions are followed, the outward facing released darts make the skirt pouf in the center front. So I made the released darts on the inside of skirt so that they faced the way I wanted! This is strictly my personal choice; another sewer may like it the way it is designed.

The next step was making the pleat in the center back. The seam is stitched along the pleat extension and is also basted just below the center back zipper opening along the pleat line. Then it is stitched again from the zipper opening to a dot, about 2/3 of the way down. The basting from the dot to bottom edge keeps the pleat in alignment with the center back seam during construction and pressing. It is removed later, although the instructions don't tell you to do this!! Press the pleats well for crisp, well defined pleat.After the sides are seamed the skirt is attached to the waistline which is very straight forward.I used an invisible zipper for the center back. I ALWAYS stablize the zipper opening with one inch strips of fusible interfacing to prevent bubbling.

For the hook and eye, I salvaged a silver pair (all the ones in my stash are black) from a bad 70's polyester dress that was in the auction fabric haul! TIP: When sewing the hook in place, to keep it steady and in the position you want, sew a couple of stitches around the hook neck. This way, it won't shift and fall when sewing though the holes.

The dress was then ready for hemming. I hemmed by straight stitching 1 1/2 inch from the bottom, then pressing up. I used lace hem tape and hand stitched the hem with a blind catch stitch. If you've never hemmed with a pleat before, don't worry - it's easy. The pleat is spread out flat and the seam allowance is clipped to the stitching where the top edge of the hem hits. Re-fold the pleat and press back into shape. *TIP - do an edgestitch on the folded edge of pleat which will always keep the pleat well formed.
Finally was the belt construction. This was also very straightforward. This is a GREAT belt as it is curved and follows the shape of the back/behind. It's SOOOO flattering as it lays beautifully, much nicer than a belt that is a straight strip. I used a wooden buckle, salvaged from the same bad 70's polyester dress ... I used fusible interfacing again instead of sew on, and after turning, I added edgestitching all around the belt. I think ig helps the belt keep it's shape and makes it more professional looking.

That was it! I just love, love, LOVE this dress. It amazes me how COMFORTABLE it is, despite the fitted design! My 11 y/o son said "It's one of your better ones Mom."I can see this dress made from many fabrics. I made mine as a summer sun dress. It is my 43rd birthday on Saturday and I plan to wear it to a restaurant where we can dine outdoors. But it would be equally beautiful in a shantung, crepe or other evening fabric for a fine cocktail dress.

This dress sizzles!

Thursday, May 28, 2009

On to the Business of Dresses

I enjoyed sewing my apron. It was a fun project. I like projects that give my brain a "rest" after a bigger or more complicated project. My true love, however, is dresses (and costumes). I use the time during the in between projects to conceptualize my next project or two or ten.

I started a new dress a couple of days ago. It's a late 50's mail order pattern that was in last weekend's auction haul. It was still in its original mailing envelope from The Corn Belt Dailies. I couldn't believe my good fortune, not only on the entire lot, but on this pattern in particular. It's one that I'd bid on before and lost. So, despite my very long list of patterns to be sewn "next", this one trumped them all and went straight to the top.

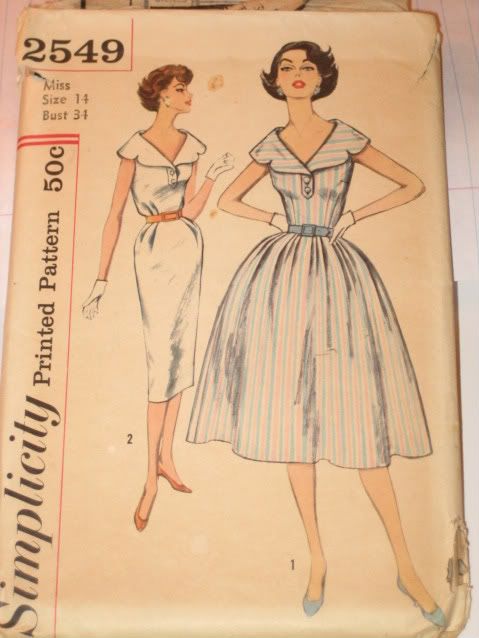
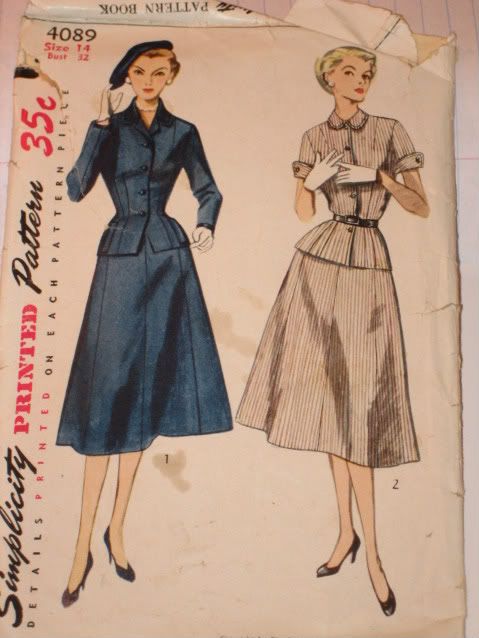
I'm using a cotton that's been in my stash for almost two years. It's a vibrant, hot red with a leaf design that has some gold highlights. I always envisioned it made up in a slim-styled, hubba-hubba dress - the kind you'd wear to a Luau or pool party. (Note: I personally don't have the 50's bustline that produces true hubba. It doesn't stop me from enjoying the styles though!)

It is a size 14, 34B-26W-36H. Normally 34B is much too large for me and I have to alter to remove excess fabric that gapes along the center back and high bust areas. This pattern, though, seems to run smaller than usual for this era... After a tissue fit, I determined that I didn't need to cut the bust/back areas smaller. Any tweaks could be done from cutting as is. I shortened the shoulder straps by one inch, and added an inch to both the waist and hips.

The fabric is easy and a pleasure to sew; it hardly frays. I'm finishing the seams simply by pinking. Here's the inside of the bodice; the straps criss-cross in the front and then go straight down the back and attach to the back bodice.

It's a very straightforward construction and is going together well. I've added some understitching along the front and back facings to prevent rolling. The instructions didn't include this step and I'm not always sure on these vintage patterns if it's assumed that you know you should do this... regardless, I often add understitching because I like the clean, straight edge it gives.

The dress is nearly finished. I just need to add the zipper, which happens to be a center back on this pattern. Then it's just the hem and the belt. I tried it on yesterday after attaching the skirt, hoping all of the fitting adjustments worked. I'm really happy so far and can't wait for it to be finished!

Monday, May 25, 2009

I'm thrilled to have finished my apron!

It was kind of a busy week with school winding down. Also, we finalized plans and signed a contract this week to have pool built! I'm really excited about that!

Finally, we had another huge haul of vintage patterns and fabric from an auction on Saturday. DH went and brought back TONS of stuff for me! I'm in the process of sorting and documenting it all and will post here about it soon.

But back to the project at hand, my apron. I love this apron. It's such a good feeling when something turns exactly how it was envisioned! The fabric really is what makes it. The one "embellishment" that I took the liberty of doing was the applique flowers on the pockets. After fusing them on, I used a very narrow zig zag over the top of the existing embroidery work. I chose this rather than a satin stitch because it matched the flower's stitching more closely.

Since I was home by myself, Doris said she'd gladly model the apron for me. Here she is in the kitchen. DH said, though, that she's kind of useless because she never cooks anything! Who needs to cook when you look as good as she does?


Monday, May 18, 2009

Creative Apronry

I that think you are either an apron person, or you are not.

I firmly fall into the "I am" category. My latest project is a 1950's apron. It has four varions.

It's easy to assume that I bought it for the full, bib style, which is very eye catching. But I didn't. I *will* make that one eventually, but it was View 3, the one with the overlapping pockets, that caught my fancy.


The fabrics that I'm using have been in my stash for a couple of years. One of them is an ivory cotton/linen blend with periwinkle blue embroidered flowers. The other is a 100% linen periwinkle. I originally bought the solid linen then grabbed the ivory some time later when I saw it. The embroidered blue flowers were a great match for plain, blue linen. I would have passed it by otherwise.


It was alway my intention that these two fabrics be used together; however, on what has eluded me... until I saw this pattern. The ivory fabric was made with a border along the bottom edge, just perfect for an apron!

In the spirit of creative apronry (I think I've invented a word), I'm attempting to make it more interesting. I'll use the blue linen for the pockets, waistband and ties. The overlapping pockets are a fun feature, but on their own, they are kind of boring. I'm going to embellish them by making an applique from the flowers on the ivory pocket.

Making an applique isn't difficult, it just takes a little extra time. First, I cut out a square with the flowers in the middle. They were then fused onto paper-back, two sided interfacing. After fusing, the paper is left on and cut around the design. I will then peel off the paper and fuse it onto the pocket, then stitch in place.


However, before attaching the appliques, I wanted to be sure the placement was right. So I stitched the top facing down and sewed the bias tape around the pockets' edges.

I conveniently had matching double fold bias tape. (At one point I was going to make a Renaissance outfit from this fabric...) With the curve of the pockets, I took my time to assure that the bias tape was sewn on evenly and smoothly.

Getting bias tape to lay smoothly around curves isn't difficult. It's what it's supposed to do, but can be frustrating if you've not done it before. All you need to do is work a little bit at a time and press as you go.

Starting at the top edge, place the fabric inside the tape so that it hits the fold. Pin. Move ahead and repeat. As you come to the curve, work a little ahead so that the tape is distributed evenly around the curve.

Use the tip of your iron and press a tiny bit at a time, working from the outside in. Any puckers will smooth out. That's the beauty of bias tape. Then pin in place. Don't be afraid to use as many pins needed to keep the curve flat and the fabric in place.


Work all the way around then you're ready sew! After sewing, go back and press again. Voila!


I hope that this apron turns out nicely. Ladies back in the day took pride in their aprons. I want mine to do them justice. Fingers crossed!

Saturday, May 16, 2009

The Resurrection: As I Tiptoe Back into my Blog...

...I hope that I'm not in for a stoning!

Firstly, I must say that I feel bad, exceptionally bad, that I've not posted here in almost a year! I don't want to make excuses, but here's my best shot at one:

After we moved in our new house last June, I got a bit overwhelmed. Shortly after we were in, I had some dear friends come in from New Jersey for a visit. I was THRILLED, and dropped sewing to finish unpacking and get ready for my first guests in our new home.

THEN, a week later, we headed out to vacation in Portland.

THEN, five days later, the boys started at their new school.

THEN, we became Cub Scout den leaders because nobody else would do it.

THEN, my little brother came for a five day visit.

THEN, the day after he left, my mother-in-law from England came in for a two week visit.

THEN, it was Halloween (a big deal in my house).

THEN, I was dead from said mother-in-law visit. By the time I recovered, it was time for my family and our neighbors to come over for Thanksgiving.

THEN, it was the Christmas and holiday season...

...so by the time the New Year came and went, I didn't know what hit me and I lost complete momentum for my blog. I was sewing in between all of this, and on a few occasions, started to write a post. But I always felt rushed and that my writing was not well done, so I scrapped it and never posted.

I'm so sorry...

BUT, I now feel that life's pace has found itself nearly a year on... so I hope that you'll still stick around with me. I promise I won't go anywhere this time.

So to kick off The Resurrection, I thought I'd post about a new endeavor of mine: Auctions.

Auctions are a great place to hang out if you are a vintage/antique/retro junkie like me (and my husband). Earlier this month, we went to one and to my delight, I picked up over 300 vintage patterns! Most were ladies' dresses from the 30's - 80's, plus a vast batch of children's from the 50's. There were also gadgets like a 1940's Singer Buttonholer. The whole shebang cost $15.50.

It's amazing what you can tell from a person's life just from their sewing stash. This lady was married in the 40's and originally lived in Wisconsin. Her oldest 40's mail order patterns were addressed to her there. While the haul didn't include any super glam ball gowns, there are many smart suits and dresses. She definitely was well dressed.

She moved to central Illinois by the early 50's and that's the timeframe of her maternity and baby/toddler patterns. She had at least one each, a boy and girl, as there are children's patterns for both. Of course, there are FAR more girl's patterns than boy's! But she sewed for them a LOT as there are many, many children's patterns. There are also doll clothes patterns.

Most of the mid 60's - 70's patterns are a larger bust size than the 40's and 50's patterns, about the time her daughter(s) would have been teenagers/young women. They are also the youthful, hip styles from that time.

In amongst the sewing gadgets and supplies, were her husband's business cards and stationery on which she wrote notes and equated alterations/yardages. He was a local insurance broker.

I was captivated by this haul. The first day I had it home, I mulled through it for hours and hours. It really captured a small snapshot of a woman and her family's life.

I've begun taking pictures and have uploaded the first 57, from the late 50's through the early 60's. I've included a link to my photobucket album and have uploaded a few of my favorites.


http://s108.photobucket.com/albums/n16/TheOldSchool_2006/VintagePatternsMay2_Auction/?start=0
Enjoy!

On another humble note: Thanks to everybody who voted for me in PR's Vintage Pattern Contest. I was both surprised and thrilled to win First Place, given the amount of talent shown in the contest. The votes coming from my fellow sewers means a great deal to me indeed!

Oh, and that knit dress in my last post??? It was a big, fat WADDER!!! I rushed sewing when there was so much to do, that it never turned out! At least I know how to call a wadder and move on!